 Introduction
For some time I suspected that with the introduction of the cd and the technological improvements of converters and accompanying electronics it becomes harder and harder to judge the loudness of the sound with your own ears. With speakers you can detect the loudness of the sound in different ways. Those methods are none existent when you use a headphone. You don't feel the bass sound any longer, you don't hear glassware rattle etc. Add the fact that modern headphones, special those from known brands which have to keep up some kind of standard, can give a loud sound without any audible distortion. If you also use audio equipment with a high standard than the risk might be there that you setup the headphone too loud. The consequence, special with prolonged listening, is hearing damage. Only you will find out at a time that it is too late and irreversible.
A solution?
On the headwize forum I did asked some time ago if there where systems for active measurement of the loudness of a signal when you use headphones. In other words a system that measures the sound pressure level on your ears! The feedback was more or less if I could develop such a system! I did get back to work and soon it appeared that this was not a simple "diy" job. Headphones do have no standard at all or do have all there own standards, its just the way you look at it. Modern headphone manuals or leaflets do have a table, sometimes in decibels, which tell something about efficiency or maximum power and can only be understood by technical users. Those tables don't tell if this means that you can turn up the volume a quarter or half and how loud this will be. This relation can be made with some calculations, but it is of course much better to measure it. On tour on the internet didn't get me a solution or it was too expensive for the diy'er. I had to find an other way. The rest of this page is based on what an amateur can get in the Netherlands in a relative easy way. Technical way amateur standards are used, in other words a professional sniff at it or settles for not serious enough, tolerances too wide etc. Professional measurement is possible, but it does have (unfortunately) also a price tag. My point was simple, easy construction and if it doesn't work out not too much money thrown away.
Preliminary survey
I have some standard books about sound in the library. All have without exception the sound level meter from Realistic cat.no 33-2050 in the columns as a reliable and cheap measurement tool with good results comparable to much more expensive measuring-instruments.
 Used with sense the results are very usable. I own such a meter. Pioneering with the meter and a headphone soon revealed that the distance and "free field" measuring did matter a lot to the precision of the meter reading. It is not a representative practical measurement because the headphone does have its own acoustical space between the can/ear pads and the ear and does have its own laws and calculation methods. Using your own head does have two major handicaps, it is almost impossible to read the measured values and there is the risk of damaging your own ears during testing. So I have to come up with something else.
Dummy head from styrofoam
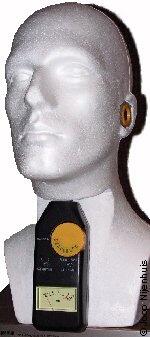
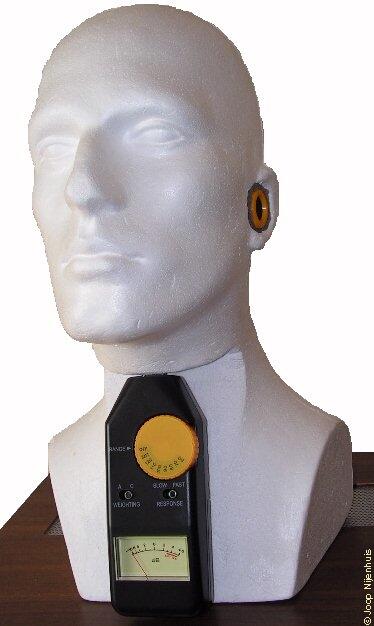
I looked for a dummy head from styrofoam (some kind of packing material). These can be bought in different models. Some time ago I had a model with a big hole in the bottom for mounting on a pen or something like it. Only I did throw it away because this model wasn't suitable for the purpose as a headphone carrier, this will damage the headphone! My new model dummy head is totally solid and does have a "torso". This model is very usable and can be bought in "hobby" shops where paint, drawing and diy materials are sold. Under the chin is enough space for mounting measurement devices.
A decent sound level meter
I turned the Realistic (Tandy / Radio Shack) sound level meter (cat.no 33-2050) over and over, viewed it from all sides. I felled some aversion for taking the instrument apart. The head with the measurement microphone is very large and not easy to dismount. If I used the Realistic for this purpose than I don't have a sound level meter for fieldwork anymore. So I settled in finding a replacement. I found a replacement with the analog sound level meter from Velleman with part number (type) AVM2050 (the type indication 2050 is very coincidence!).
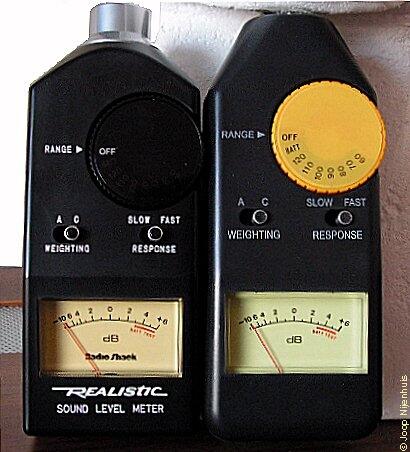 This instrument can be bought in electronic parts shops and compared with the Realistic its almost like two drops of water. The meter is also analogue, does have a large rotating selector with the same numbers. It also have switches for A&C weighting and for fast/slow response. The calibration hole is in the same place and the output connector is also in the same place. The only difference is the head with the measurement microphone which does have a different colour and a simple construction and mounting. The cover of the battery compartment does have a different construction, the one of the Realistic meter is more handy, but this is a practical detail. The real difference is only printing and some manufacturing techniques. Manufacturing techniques?, the print on the housing from the
Realistic meter are superscripted in the plastic, you can feel the characters. On the Velleman the labels are printed, the housing feels very smooth. For this reason I like the Realistic better suited for fieldwork. The meters are also identical in measurement! At intervals a dB more or less, but those are adjustment and component tolerances. So for my purpose this meter was very suitable.
This instrument can be bought in electronic parts shops and compared with the Realistic its almost like two drops of water. The meter is also analogue, does have a large rotating selector with the same numbers. It also have switches for A&C weighting and for fast/slow response. The calibration hole is in the same place and the output connector is also in the same place. The only difference is the head with the measurement microphone which does have a different colour and a simple construction and mounting. The cover of the battery compartment does have a different construction, the one of the Realistic meter is more handy, but this is a practical detail. The real difference is only printing and some manufacturing techniques. Manufacturing techniques?, the print on the housing from the
Realistic meter are superscripted in the plastic, you can feel the characters. On the Velleman the labels are printed, the housing feels very smooth. For this reason I like the Realistic better suited for fieldwork. The meters are also identical in measurement! At intervals a dB more or less, but those are adjustment and component tolerances. So for my purpose this meter was very suitable.Construction
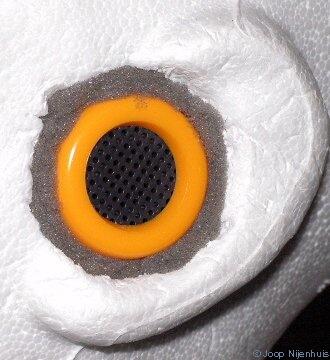 Now I have a styrofoam head and a new separate meter, its still not a headphone sound level meter. Complete new out of the box I dismantled the meter. It appeared that the yellow head and the microphone were easy to disassemble. I adjusted the torso and the neck in such a way that I had a flat surface for the meter. I drilled holes to a center point in the head from the chin and from the ear. The two holes join somewhere in the center of the head. I adjusted the hole in the ear with a very sharp knife in such a way that I could mount and fix the microphone with some shock absorbing materials. After that I adjusted the hole in such a way that I could mount and fix the yellow head. Its a protection device for the microphone and I mounted it in the styrofoam head on the left side by coincidence. I didn't use any fixing material like glue or so.
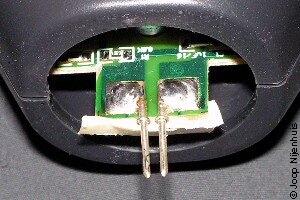
|
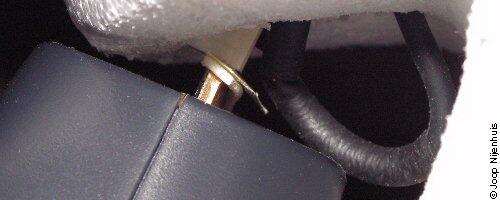
|
Headphone sound level meter in use
Its getting exciting! Will the headphone sound level meter exactly do what I had in mind? I made some comparative measurements with use of music and test reference signals ( called software in present days, that's modern) with the Realistic meter and the adapted Velleman meter. The results where identical with a maximum deviation of about 1 to 2 dB, sometimes difficult to value on the meter scales. This is a very acceptable error for amateur purposes. It is always better to listen to a sound level of measured 90 dBspl, which is in reality 92dBspl, than getting deaf slowly with nothing at all at 110dBspl.
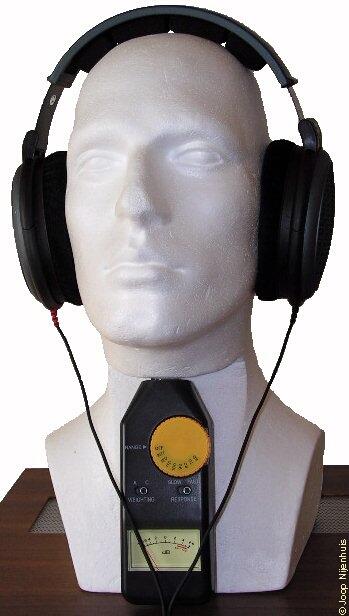 The outcome of this is that the volume is adjusted downwards for a fair part. I was listening at an average sound level of 100dBspl with peaks just over the 110dBspl. Now the volume is adjusted in such a way that the average readout is 90dBspl with an incidental peak to the end of the scale. Surprisingly is that after a few weeks with most of
the music you don't know any better that the level is much lower. Only with some cd's I will turn up the volume to a level of about 96dBspl with an incidental peak just over the 100dBspl. For a short duration this will do no harm.
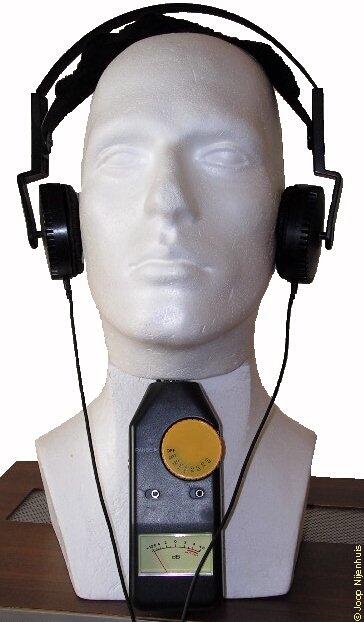 I do use different brands and types of headphones. Among those is also a nearly 30 year! old Yamaha HP-1 orthodynamic headphone. The headphone is in comparison with Sennheisers HD580 or HD600, as an example, not that
much better or worse. Despite the high age I decided to restoration instead of getting rid of it.
Only technical information was 30 years ago not that important. I couldn't find much more than the nominal impedance of 150 Ohm. Sensitivity and power handling capability are unknown to me (anymore). How to measure? I have the book "Checkpoint Audio, Professional Audio Test Reference" from Eelco Grimm in my library. Its a very useful book with two cd's. On cd1 you can find on track 2 a reference noise which can be monitored with use of the K-System with reference
"K-20" at 85dB(spl). This reference noise is special chosen in such a way that the measurement results between the Realistic 33-2050 and a professional meter like B&K 2236 are equal. So an accurate measurement is possible with the aid of this cd. Now the headphone sound level meter comes into the spotlight. The meter is set up with the range selector at 80dB(spl), switches at C-weighting and slow response. As a reference I used the Sennheiser HD580. This
headphone does have a sensitivity of 1mW 97dBspl. The volume of the amplifier is adjusted in such a way that the reference noise does give a 85 dB readout on the headphone sound level meter. The reading is as follows. The range selector numbers refer to the 0dB point on the scale and with the setting to 80(dB) the 0dB point will refer to exactly 80dB(spl). However the
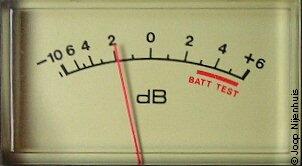
|