 The
principle The
principle
A water rocket is made of a PET soft drink bottle. This bottle is part
filled with water and pressurized with compressed air. The bottle is
closed up with a valve.
It is pressurized with a pump. When the bottle is inverted when
pressure is released, the air pushes the water out, and the bottle is
launched upwards.
You can make this your self in a very simple way.
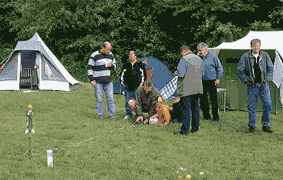 |
prepairing
the launch of a water rocket |
 |
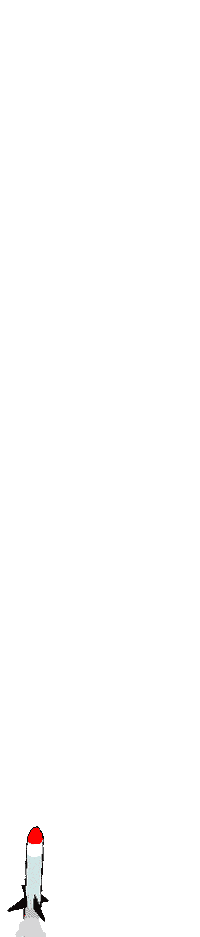
Launching...;
rocket just to quick for the picture! |

Start
simple!
For the first acquaintance with your 'own' water rocket you need only a
little amount of money for the material to do a first launch.
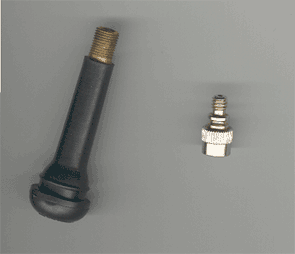 |
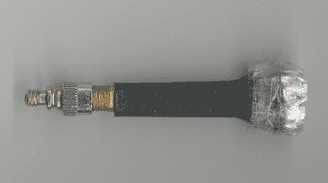
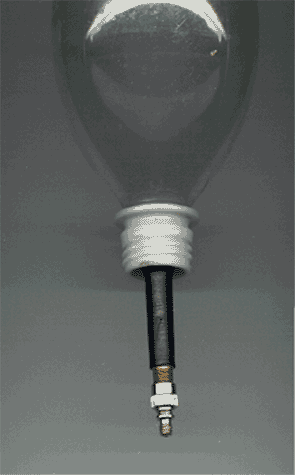
- A tubeless type valve (you
can get it
by your local garage) choose the long version.
- An air pump, suitable for
the valve, or
use a nipple for an air pump for a bike.
- Sum (cello)tape to make the
valve fit
into the bottle
- A few stones, wooden spars
or something
to place the bottle (rocket) between during the pumping.
|
| |
|
|
The top of the
valve needs to enlarged
with tape until you can get the valve hardly into the bottle.
|
| |
|
 |
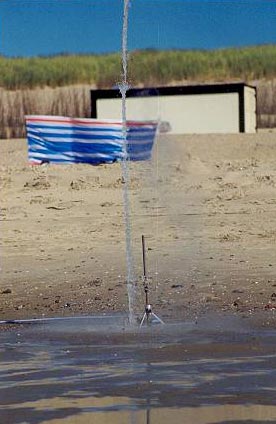
Fill the bottle
for about 40% with
water, place the valve in it, place it between the stones or sparse
and pressurize it. If there is enough pressure the rocket will launch.
With this simple water rocket you can get a wet suit, but you will have
a lot of fun! |
With this
workaround we have had a lot
of fun last vacation on the camping place. I had leave the 'professional'
launcher at home, but fortunatly I found
some
valves an other material in my luggage.
The
rocket: make something beautiful of it!
On the rocket (the bottle) you can leave all your creativity. To get
the stable in the air you can add a couple of fins near the neck of the
bottle. By this fins the flight of the rocket will be stable and
because of that het rocket will come higher.
On the web there are many sites about water rockets. A simple one to
start you can find at
Dr.DAAN but.. this page is in
dutch!
Safety...
danger
A greater height is also dangerous! The rocket will come down one
time. Its weight is about 125 gram. When that object comes down from a
great height it can become dangerous for people, pets, but also cars
and other objects.
So you better find a same place for the launchings so that people can
watch it, but can not get in on there heads!.
You can, of course, reduce the speed of the falling rocket by a chute.
Also the pressurizing of the bottle is not without danger. The bottle
can explode. In that case the splinters will fly you around the ears.
Before launching an new bottle first test it by filling it up
completely with water and pressurize it until about 8 bar pressure.
When the bottle is ok it will stand the pressure. When it is not
suitable it will crack or burst without the splinters flying around.
Just for the safety buy pressurizing use enough tube (about 8 or 10
meter) to take enough distance of the launcher.
High
heights, high speed
Of course you can calculate the height you can get, but also the speed
of the rocket is very high. A rocket pressurized by 7 bar ca get an
speed of about 200 km/hr an will go 85 until 90 meters high!
The proportions water, air en weight of the bottle are important for
the performance of the rocket. When you have to little water the rocket
will not have enough power to lift of the ground very high. When you
have to much water its weight is to heavy an to little air is in it
that it also not will lift of. SO it is important to find out the right
proportions of water and air.
Gently
down on a chute
This description
shows how to make
a simple automatic parachute system for your
water rocket.The principle is based on a nose cone in whit a
parachute folded in it. At the bottom of the
cone a piece of a thin latex
glove is connected which causes the chute and cone come of the rocket
at the
time that this is possible.
The cone is connected with a
band with elastic at the end, and a little flap that during the take
off release a big
'flap' that by
the resistance of the speed is pressed against the bottle during
the flight. When
the bottle no
longer has speed (probably at the
highest point of the flight) the flap will release and will
eject
the cone of the top of the bottle. To prevent the valve
snaps off prematurely (i.e.
before the flight) its blocked by a smaller flap. This small flap will
unlock immediately after the
drag down blows. I have made the chute of
a thin piece of garbage sack (no image).
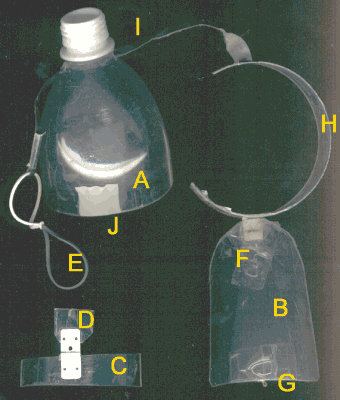
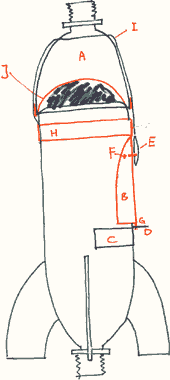 |
- The nose cone made of a pease of PET bottle. at the top
2 holes are made for strip (I)with the elastic.This keeps the cone connected to
the rocket when it comes down at the chute.
- The main flap made of a peace PET bottle.
At the bottom of the flap a pin (G) is connected (taped). This pin fits in a small hole
of the little flap (D).
On 2,5 cm of the upper side of the flap a pin (F) is connected (via a hole taped to the back side)
behind this pin an elastic is held.
- A strip made of a peace of a PET bottle.
A little flap (D) made of a hinge used for model planes is connected to the strip.
- The little flap, with the little hole for the
pin (G) of the main flap that holds the main flap before take of.
- An elastic band connected to the strip
(I). The elastic band must be connected with some resistance over the pin
(F) on the main flap. This keeps the nose cone on the rocket during the flight.
- A pin made of a peace of a paper clip, is
put trough a hole in the main flap en connected with tape from behind.
- The safety flap that keeps the main flap
before en during take of. This safety flap is made of a hinge used
for model planes, with a hole for pin (G)of the main flap.
The hinge can made bigger with some cello tape.
The plan is that when the rocket is launched this flap goes down because
of the resistance of the air. This releases the main flap, but this
main flap will open when there is no resistance of air anymore.
- A strip made of a piece of a PET bottle.
The main flap (D) is connected with a hinge to this strip. The strip (I) can be
connected with tape to the bottle.
-
The strip that keeps the nose cone on the rocket. This strip is passed
through two hole in top of the nose noce. On one side a elastic is connected
to the strip.
- A strip made of a piece of a latex glove, connected
to the out side of the nose cone with tape.
The purpose of this strip is:
1. keeping the chute in the cone
(the chute is connected to the rocket with a strip (H).
2. to release the nose cone, after releasing of the elastic (E) when the main flap
comes free from the rocket body. When the nose cone is released the chute comes free.
|

