LineIn plugin for Winamp 2/5 Documentation - Customizing
Up | Previous | Next | Down
The title
This is actually a small section on how to set the title, just because it's nice to have the plugin look the way you want it to.
In its simplest form you would use these options:
But, very common would be:
line://title=My radio,hideformat
This will remove the format string (44100Hz, 16bit, etc.) But this is only the most simple form of the title option, more advanced would be:
line://title=My radio @ %srHz\, from the %dn,hideformat
This would display something like this:
- My radio @ 44100Hz, from the WaveMapper
Note the %sr variable and the '\' in front of the ','. The %sr variable expands to the samplerate being used (see the Option reference for a full list of variables) and the '\' quotes the ',' so it won't be interpreted as the boundary between two options.
Presets
From v1.50 my plugin supports presets, which is a really cool option, because now you can make presets of all your favourite settings and it will be much easier to use them.
Adding a preset
To add a preset all you need to do is figure out which settings you would like to be a preset and then make a preset out of them, which is done by pressing going to the Winamp preferences (Ctrl-P), then select the input plugins category (1), select my plugin (2) and click the configure button (3):

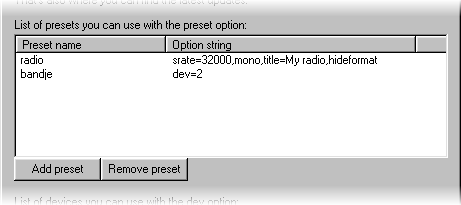
In the configuration dialog of my plugin you will see a listbox with presets, which should be empty if you haven't added some presets already, in my case I've already added some presets:
If you want to add a preset, all you have to do is press the add preset button, this will get you a dialog in which you can enter a preset name and option string, of which at least the preset name should be filled-in. The option string can be anything that you can normally put after line://, including the preset option, which can be very usefull, but which should also be done with care, if you create a loop and use one of the presets in that loop, the plugin will hang (only in v1.50, v1.51 will automatically stop processing after the 256th level, from v1.70 it stops at the 100th level):
- Suppose you have these two presets:
def: preset=recording,dev=2,bps=24
recording: preset=def,title=Recording
Suppose you would use the recording preset, on play my plugin would encounter the preset=def option, then it would look-up the def preset and process that, then my plugin would encounter the preset=recording option and it would look-up the recording preset and process that, etc, etc, etc, ...
Removing, changing and renaming a preset
All you have to do is go to configuration dialog of my plugin, as explained above. Then you can remove a preset by selecting one and clicking the remove preset button.
To rename a preset you can select a preset and then click its name again (or press F2), then you can simply type a new name, just like renaming a file in Windows Explorer.
To change a preset's option string you have to double-click a preset, this will get you the same dialog as when you are adding a preset, only the preset name edit box is disabled. This is similar to changing a string value in the registry editor.
Using a preset
Now that you've created some presets, you might want to start using them. All you have to do is use the preset=x option, like this:
The above will have the same result as typing the following (on my computer):
line://srate=32000,mono,title=My radio,hideformat
So it is not that hard to use a preset, but what if I wanted to use my radio preset with a higher samplerate for one time (so I don't want to change the preset)? This can be done very easily:
line://preset=radio,srate=44100
That would have the same result as:
line://srate=44100,mono,title=My radio,hideformat
Or to be more precise:
line://srate=32000,mono,title=My radio,hideformat,srate=44100
Because that's how the plugin works, it first processes the preset and then it processes the rest of the options with the options of the preset as defaults.
Some notes on using presets
- You can use the preset option within a preset, but you should take care to avoid loops, because they will hang the plugin (from v1.51 the plugin won't hang, it will stop processing and tell you there was an error processing the parameters).
- The preset option can only be the first option specified, but you can use more than one preset by specifying them after one another, like this:
line://preset=bandje,preset=radio
Would have the same result as:
line://dev=2,srate=32000,mono,title=My radio,hideformat,srate=44100
NOTE: From v1.70 this rule has changed, you can use a preset anywhere you like, and it will be handled just as if you would have typed it out.
- Presets follow exactly the same conventions as the normal way of specifying options.
Up | Previous | Next | Down
To contact me, please mail to: th.v.d.gronde@hccnet.nl
I hope you'll enjoy my program(s).